The High-Protein, Low-Carb Kitchen: A Cross-Protein Master Guide
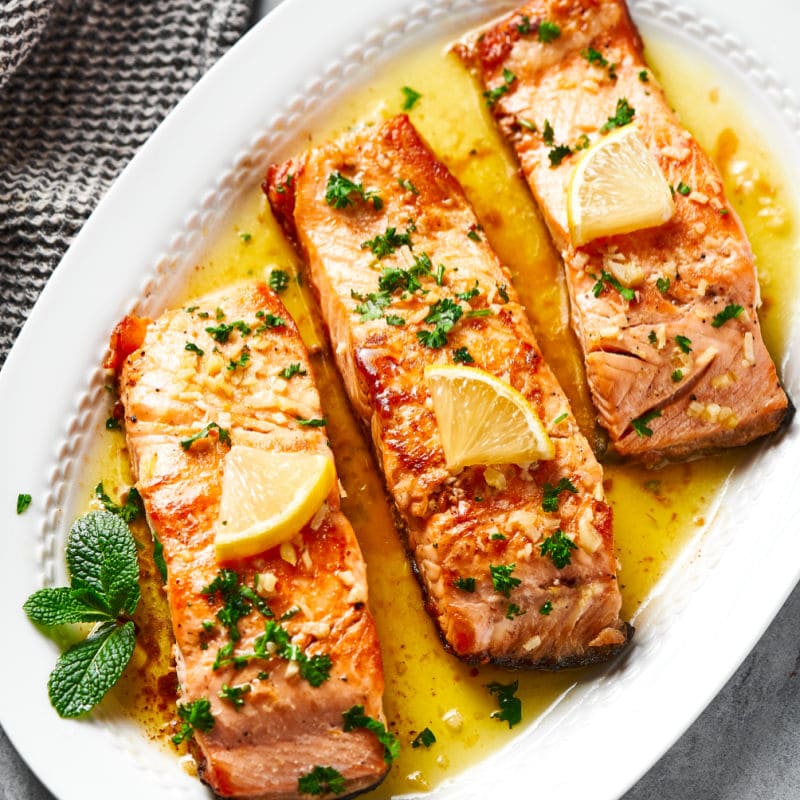
Photo: lyceumnews.com
The High-Protein, Low-Carb Kitchen: A Cross-Protein Master Guide for Serious Home Cooks
The single biggest lie in low-carb cooking is that it requires sacrifice. It doesn't — it requires technique. Every protein in this guide, from salmon to shrimp to flank steak, is governed by the same three laws: dry surfaces create crust, salt applied correctly builds flavor from the inside out, and pulling proteins from heat before they're "done" is the only way to serve something juicy. Master those laws once and they transfer across every recipe here without modification.
The Universal Technique: The Dry-Sear-Rest Doctrine
This is the through-line that connects every recipe in this guide. It doesn't matter whether you're working with a salmon fillet, a pork tenderloin, or a pound of shrimp — the same foundational logic applies, and every shortcut that actually works is a variation on this sequence, not a departure from it.
Step 1 — Salt early or salt at the last second. Never in between. Salt the protein either right before it hits heat, or at least 40–45 minutes ahead (overnight on a rack in the fridge is ideal). The window between 5 and 35 minutes is the dead zone — osmosis pulls moisture to the surface faster than it can reabsorb, and that pooled liquid is liquid insurance against a proper sear. This applies identically to salmon fillets, chicken breasts, flank steak, and pork tenderloin. For shrimp, a 15-minute baking soda brine handles both functions simultaneously.
Step 2 — Dry the surface aggressively before heat. Paper towels, multiple passes, no exceptions. This applies to every protein in this guide without qualification. Surface moisture converts to steam the moment it contacts a hot pan, dropping the pan temperature and preventing the Maillard reaction from initiating. The difference between a lacquered mahogany crust and a gray, steamed exterior is almost entirely explained by this one step. Dry your protein like you mean it.
Step 3 — Preheat the pan until it's genuinely hot. Cast iron, carbon steel, or heavy-gauge stainless steel over high heat for 2–3 minutes before fat goes in, and fat goes in a full 30 seconds before protein goes in. A properly preheated pan sets the exterior proteins on contact, preventing the protein-to-metal bonding that causes sticking and skin tearing. If you add protein before the pan is truly hot, you've already made a mistake that can't be recovered.
Step 4 — Apply pressure at the beginning, then leave it alone. For salmon: press the skin side firmly with a flexible spatula for 10 seconds immediately after adding to the pan — the skin will buckle and curl without this contact. For shrimp skewers: press the skewers lightly against the grates. For chicken cutlets: the initial weight of the pan keeps them flat. The first 60 seconds of contact define the crust. After that, stop touching the protein until it releases cleanly on its own.
Step 5 — Cook mostly on the first side. J. Kenji López-Alt's foundational insight — the 90/10 rule for salmon, the 80/20 rule for chicken, the frequent-flip rule for steak — all point in the same direction: develop your crust predominantly on the first side, then use the second side as a brief finish. The corollary is to reduce heat after the initial contact to prevent the exterior from burning before the interior catches up.
Step 6 — Pull early and rest on a rack. Every protein here should come off heat 5°F before the target doneness. Salmon: pull at 120–125°F for medium-rare. Chicken: pull at 155°F. Pork tenderloin: pull at 140°F. Flank steak: pull at 125–130°F. Rest on a wire rack, not a plate — a plate traps steam and softens the crust you just worked to build. The carryover cooking handles the rest. Cut early and you'll watch your dinner bleed out onto the board.
Pro Tip: "If you think boneless, skinless chicken breasts are dry or flavorless, it's only because you've never had them cooked properly." — J. Kenji López-Alt, Serious Eats. The same statement is equally true for every protein in this guide. These are not boring ingredients — they are unforgiving ones.
Fish: Salmon and the 90/10 Rule in Practice
The subcutaneous fat layer between salmon's skin and flesh is not just flavor — it's a built-in heat shield, and every great salmon technique exists to exploit it. The skin-side-down method cooks the fish through from the bottom up, using that fat layer as insulation against direct pan heat.
1. Kenji's Crispy Pan-Seared Salmon — The Definitive Baseline
Time: 5 min prep / 10 min cook | Difficulty: Easy | Yield: 4 servings | Est. Macros: 57g protein / 0g carbs / 39g fat
This is the recipe against which every other pan-seared salmon should be measured. Four ingredients, one pan, zero carbohydrates, and a technique so systematically engineered it has been tested across thousands of home kitchens. The 0g carbohydrate count makes it the cleanest option in existence — nothing to track. What separates it from every other "simple salmon" recipe are two steps most home cooks skip: the cold-to-hot pan transition (add fish immediately after reducing heat, before the pan has a chance to superheat) and the 10-second press, which prevents skin buckling and ensures even contact across the entire fillet.
Key Ingredients: - 4 skin-on salmon fillets, ~6 oz (170g) each - Kosher salt and freshly ground black pepper - 2 tbsp vegetable, canola, or light olive oil
The Method: 1. Press fillets between paper towels until the surface is completely moisture-free on all sides. Season generously with salt and pepper on both sides. 2. Heat 2 tbsp oil in a 12-inch stainless steel or cast iron skillet over medium-high until shimmering and just beginning to smoke. 3. Reduce heat immediately to medium-low. Add one fillet skin-side down, pressing firmly with a fish spatula for 10 full seconds. Add remaining fillets one at a time, pressing each for 10 seconds. 4. Cook skin-side down without touching, pressing gently every minute or so to maintain contact, until the skin releases cleanly from the pan — 5 to 7 minutes total. The fish will tell you when it's ready: force it early and you'll leave half the skin behind. 5. Flip using a spatula with a fork as support. Cook flesh-side for exactly 15 seconds. 6. Transfer to a paper towel-lined plate. Rest 2 minutes before serving.
The hack: No thermometer? Look at the cross-section from the side. When the opaque cooked band has climbed approximately 75% of the way up the fillet from the skin side, you're at medium-rare. Pull now.
Serious Eats — Crispy Pan-Seared Salmon Fillets
2. Keto Salmon with Garlic Butter — The 9-Minute Crowd-Pleaser
Time: 1 min prep / 8 min cook | Difficulty: Easy | Yield: 4 servings | Est. Macros: ~32g protein / ~1g carbs / ~18g fat | Rating: 4.96/5 (110 reviews)
A 4.96 rating across 110 reviews is not an accident. This recipe earns it through a finishing move that elevates basic pan-searing into something that tastes composed: a garlic-butter-parsley baste in the final two minutes creates a pan sauce that coats the fish without adding meaningful carbs. The lemon juice brightens the butter's richness in a way that makes the dish feel complete without any sides. This is the recipe you send to people who say they don't like salmon.
Key Ingredients: - 4 salmon fillets, ~4 oz each, skinless and boneless - ½ tsp salt, ½ tsp black pepper - 2 tbsp fresh lemon juice - 1 tbsp olive oil - 3 tbsp butter - 5 cloves garlic, minced - ¼ cup loosely packed fresh parsley, chopped
The Method: 1. Pat fillets completely dry. Season with salt and pepper, rub with lemon juice immediately before cooking. 2. Heat 1 tbsp olive oil in a large skillet over medium heat until shimmering. 3. Add fillets and sear undisturbed 3–4 minutes until golden on the first side. 4. Flip and cook 2 minutes on the second side. 5. Add butter, garlic, and parsley to the pan. Tilt the pan toward you and baste the fillets continuously for 2 minutes as the butter foams and the garlic softens and turns fragrant. 6. Remove from heat. The residual pan heat will continue cooking the fish 2–3 minutes — account for this and pull slightly before your target doneness. Serve immediately with the pan sauce spooned over the top.
The hack: Use skinless fillets here as specified — they cook faster and more evenly at this lower heat setting, and the butter baste provides the moisture protection that the skin would otherwise give you. For skin-on, add 2 minutes to the first-side cook time.
The Big Man's World — Keto Salmon Recipe
Shrimp: The Brine-and-Skewer System
The fundamental shrimp paradox: you need high heat to brown the exterior, but high heat overcooks the interior before browning can happen. Every technique below exists to solve that paradox — and the baking soda brine is the single highest-impact intervention available to a home cook.
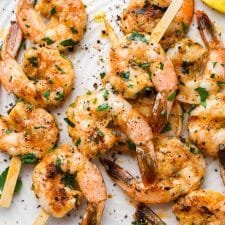
3. Garlic-Marinated Grilled Shrimp Skewers — The Weeknight Keto Workhorse
Time: 5 min active / 35 min total (including marinate) | Difficulty: Easy | Yield: 4 servings | Est. Macros: ~28g protein / 2g carbs / 10g fat
Explicitly designed for keto and Paleo frameworks, this recipe uses a double-garlic system — fresh microplaned garlic and garlic powder — for layered depth that single-source garlic cannot achieve. Fresh garlic provides sharp, volatile aromatics; garlic powder provides deeper, roasted, caramelized notes. The combination reads as "restaurant quality" without being identifiable as a trick. The marinade builds in under two minutes, and the cook time is five minutes flat.
Key Ingredients: - 1 lb peeled and deveined shrimp (26/30 count, tail-on preferred) - 3 cloves garlic, grated on a microplane - 2 tsp fresh lemon juice + ½ tsp lemon zest - 3 tbsp olive oil - 2 tbsp fresh parsley, chopped (plus more for garnish) - ½ tsp garlic powder + ½ tsp onion powder - ¼ tsp paprika - 1 tsp kosher salt + ½ tsp black pepper
The Method: 1. Pat shrimp completely dry with paper towels — this step is non-negotiable for preventing sticking and enabling browning. 2. Combine all marinade ingredients in a large bowl. Add shrimp and toss to coat thoroughly. Marinate exactly 15–30 minutes at room temperature — no longer. Lemon juice begins denaturing proteins past 30 minutes and will give the shrimp a mushy, pre-cooked texture. 3. If using wooden skewers, they should already have been soaking in water for at least 30 minutes. Thread shrimp snugly onto double skewers (two parallel skewers, ¼ inch apart), packing shrimp so they're nearly touching — this reduces exposed surface area and slows heat penetration, buying you browning time without overcooking. 4. Preheat grill or grill pan to medium-high. Brush grates lightly with oil. Shake excess marinade off skewers before placing on the grill. 5. Cook 2 minutes per side, turning once. Done when shrimp curl into a tight C-shape and center is opaque. An O-shape means overcooked — start pulling at the first C. 6. Serve immediately with fresh parsley and lemon wedges.
The hack: Use a fine microplane for the garlic rather than a knife. Microplaned garlic creates a smooth paste that distributes evenly through the marinade and clings to every shrimp surface rather than pooling at the bottom of the bowl. The coverage difference is significant.
Poultry: Solving the Chicken Breast Problem
Boneless, skinless chicken breast is not boring — it's unforgiving. The difference between cardboard and juicy comes down to three decisions made before the chicken ever touches heat: pounding to uniform thickness, brining, and coming to room temperature. Skip any of these and no amount of technique rescues it.
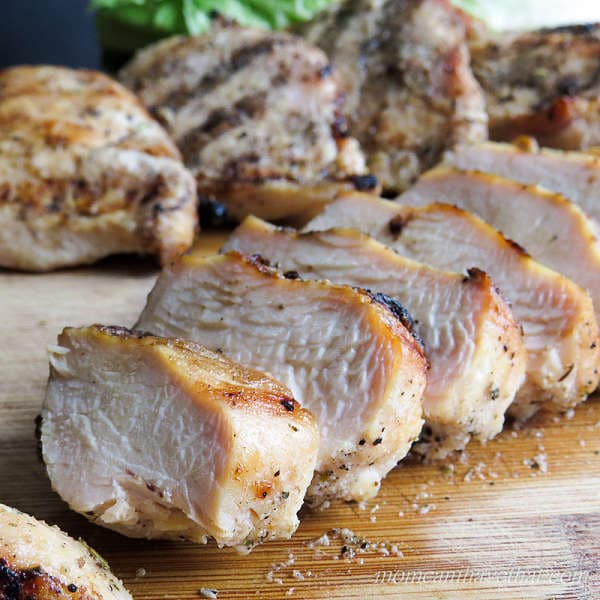
4. Five-Minute Grilled Chicken Cutlets with Rosemary, Garlic & Lemon — The Double-Duty Dressing Method
Time: 5 min prep / 5 min cook | Difficulty: Easy | Yield: 4 servings | Est. Macros: 44g protein / 1g carbs / 25g fat
This is the recipe that proves you don't need a marinade window. The rosemary-garlic-lemon vinaigrette does double duty: half coats the chicken before it hits the grate, half gets poured over the finished bird as a bright finishing sauce. The result tastes like you planned ahead when you didn't. At 1g total carbohydrate per serving, this is as close to zero-carb grilled chicken as exists. The critical discipline: make two separate containers of the vinaigrette from the start — the reserved half never touches raw chicken.
Key Ingredients: - 4 boneless, skinless chicken breasts (5–7 oz each), sliced horizontally into 8 thin cutlets - 3 medium cloves garlic, minced (about 1 tbsp) - 3 tbsp minced fresh rosemary - 2 tbsp fresh lemon juice - 6 tbsp extra-virgin olive oil - Kosher salt and freshly ground black pepper
The Method: 1. Whisk garlic, rosemary, lemon juice, and olive oil in a large bowl. Season aggressively with salt and pepper. Immediately divide the mixture into two equal portions — one in the mixing bowl, one in a separate container. The separate container is for finishing and must never contact raw chicken. 2. Slice each breast horizontally into two thin cutlets by placing your palm flat on the breast and drawing a knife parallel to the cutting board. Add to the marinade bowl and toss to coat. You can grill immediately — no waiting required with this thin cut. 3. Preheat grill to maximum heat. Clean and oil the grate thoroughly. 4. Place cutlets over direct high heat, cover, and cook without flipping for approximately 4 minutes — until only a few faint pink spots remain on the top surface, indicating the heat has penetrated almost completely through. 5. Flip and cook 30 seconds on the second side. Transfer immediately to a serving platter. 6. Re-whisk the reserved marinade and pour it over the chicken immediately while hot. Serve at once.
The hack: Buy pre-sliced chicken cutlets from the supermarket meat case and skip Step 2 entirely. This becomes a legitimate 10-minute dinner from fridge to table with no degradation in quality.
Serious Eats / J. Kenji López-Alt
Pork: The Sear-Roast Cheat Code
Pork tenderloin is the weeknight protein that masquerades as a weekend roast. Thirty minutes start to finish, naturally zero carbs, and an architecture — sear hard on the stovetop, finish in a hot oven — that produces a deep mahogany crust and a juicy interior without the anxiety of managing a sustained high-heat cook.
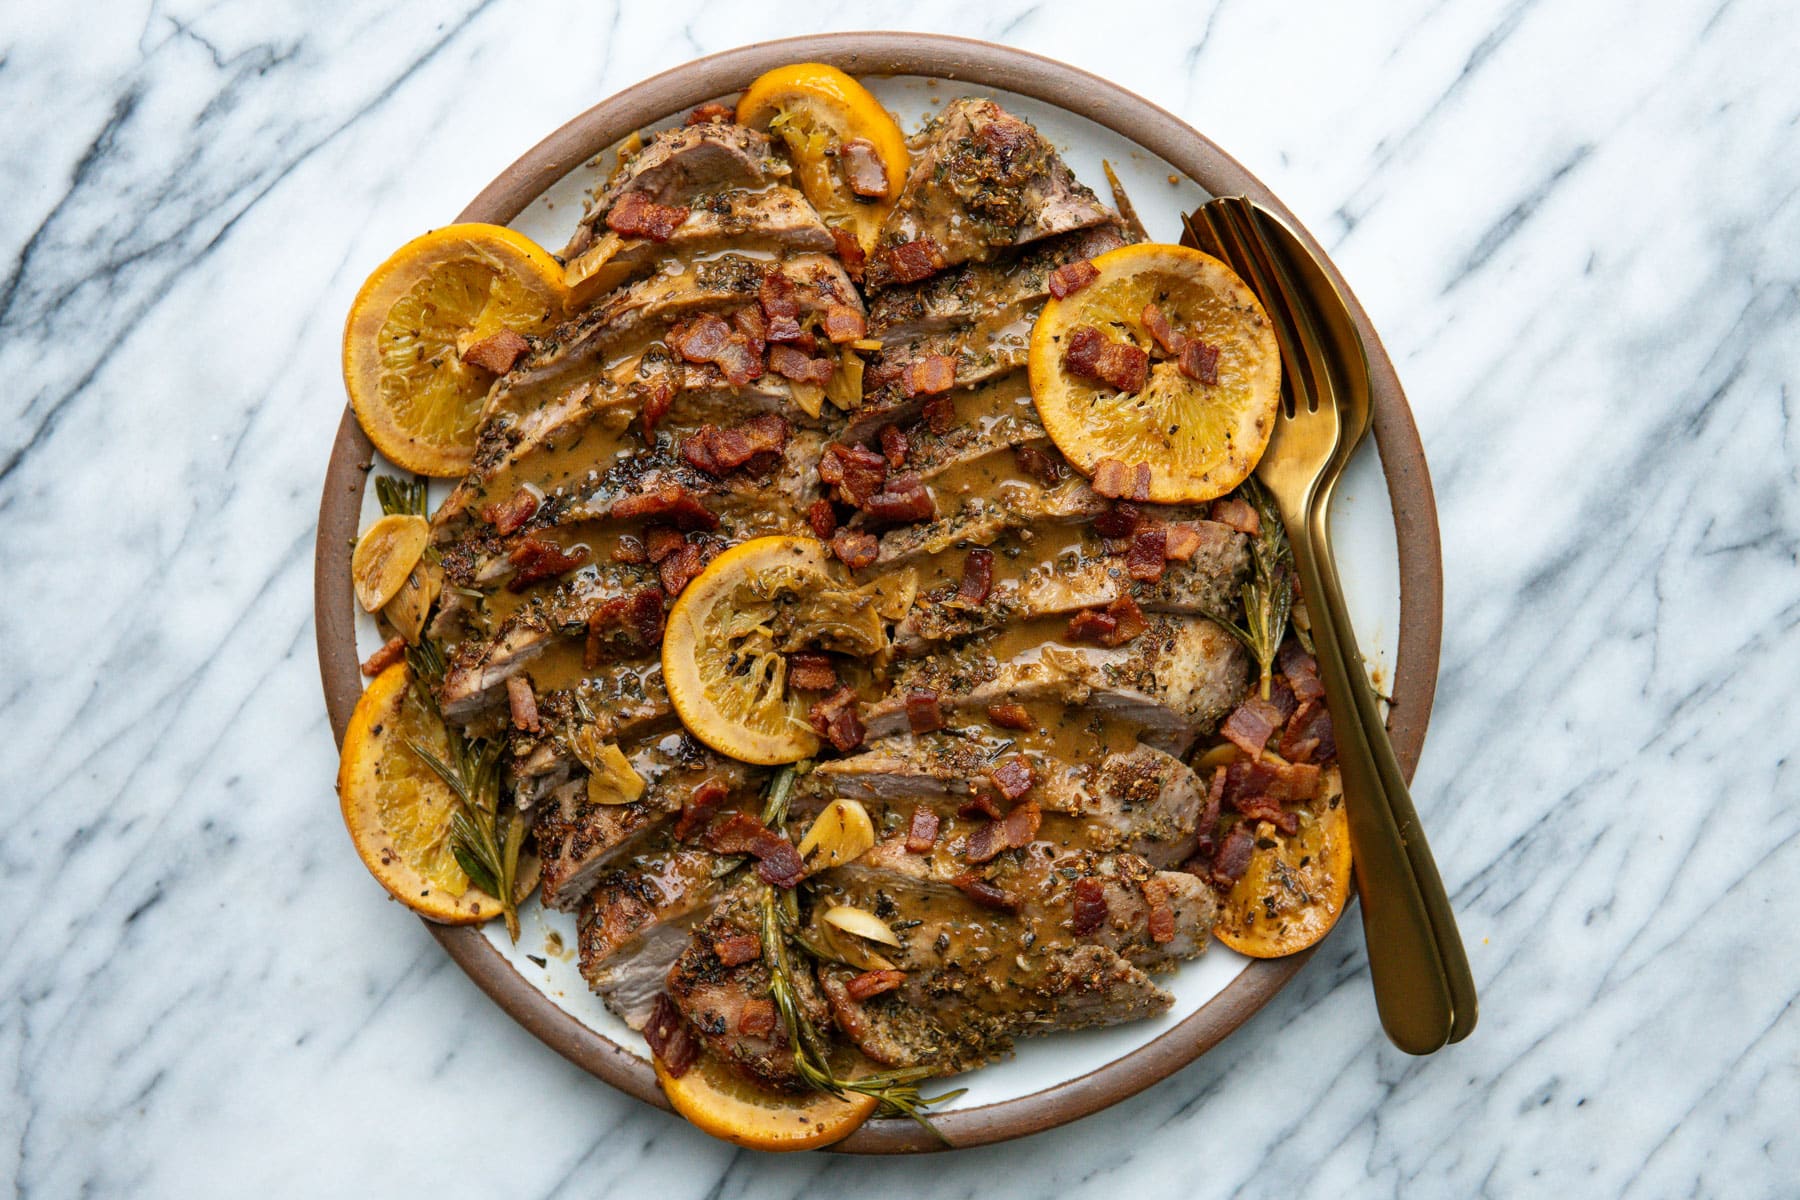
5. Rosemary Garlic Pork Tenderloin with Citrus Pan Sauce — When You Want to Look Like You Went to Culinary School
Time: 20 min prep / 30 min cook | Difficulty: Medium | Yield: 6 servings | Est. Macros: ~38g protein / 4g carbs / 14g fat
This is the version you make when the occasion demands something that tastes genuinely composed. The fresh fennel seed ground coarse with rosemary creates a layered herbal profile that single-herb rubs can't match — fennel's anise notes bridge the gap between rosemary's pine and pork's natural sweetness. The citrus pan sauce built from the fond turns a weeknight sear-roast into something that earns compliments. Total active time: under 20 minutes.
Key Ingredients:
For the pork: - 2 (1 lb) pork tenderloins, silverskin removed - 2 tbsp finely chopped fresh rosemary - 2 tbsp ground fennel seeds (whole seeds pulsed 10 seconds in a spice grinder) - 4 cloves garlic, grated on a microplane - 4 tbsp olive oil (divided) - 1½ tsp kosher salt + 1 tsp black pepper
For the pan sauce: - ¼ cup fresh orange juice - 2 thinly sliced garlic cloves - 2 fresh rosemary sprigs - 2 tbsp cold butter, cut into cubes - Zest of 1 orange
The Method: 1. Combine rosemary, ground fennel, grated garlic, 2 tbsp olive oil, salt, and pepper into a thick paste. Remove the silverskin from the tenderloins by sliding a boning knife under the membrane at one end, angling slightly upward, and pulling it off in one strip. Coat tenderloins thoroughly in the paste. Marinate 20 minutes at room temperature while the oven preheats to 400°F. 2. Heat remaining 2 tbsp olive oil in an oven-safe cast iron or carbon steel skillet over high heat until shimmering and just beginning to smoke. 3. Sear tenderloins 2–3 minutes per side, rotating to hit all four surfaces — approximately 8 minutes total. You want deep mahogany, not gray. Pale meat means your pan wasn't hot enough. 4. Transfer the entire skillet to the 400°F oven. Roast 12–15 minutes until an instant-read thermometer reads 140°F at the thickest point. Remove tenderloins to a cutting board to rest, covered loosely with foil. 5. Return skillet to medium heat on the stovetop. Add sliced garlic and rosemary sprigs; cook 30 seconds until fragrant. Add orange juice and scrape up all the browned fond from the bottom of the pan. Reduce by half, about 2 minutes. Remove from heat and swirl in cold butter cubes one at a time until the sauce is glossy and emulsified. Add orange zest; season with salt. 6. Slice tenderloin on a bias into ½-inch medallions and spoon sauce over the top. Serve immediately.
The hack: Freshly ground fennel seed has three times the aromatic intensity of pre-ground. Buy whole seeds and pulse them in a spice grinder for 10 seconds. This one swap makes the rub noticeably more complex.
Beef: Flank Steak and the Grain Direction That Changes Everything
Flank steak punishes laziness and rewards precision. Get the sear right and slice against the grain, and you have a restaurant-quality plate for under $15 that clocks in near zero net carbs. The entire game is heat management and a sharp knife — two things that cost nothing.
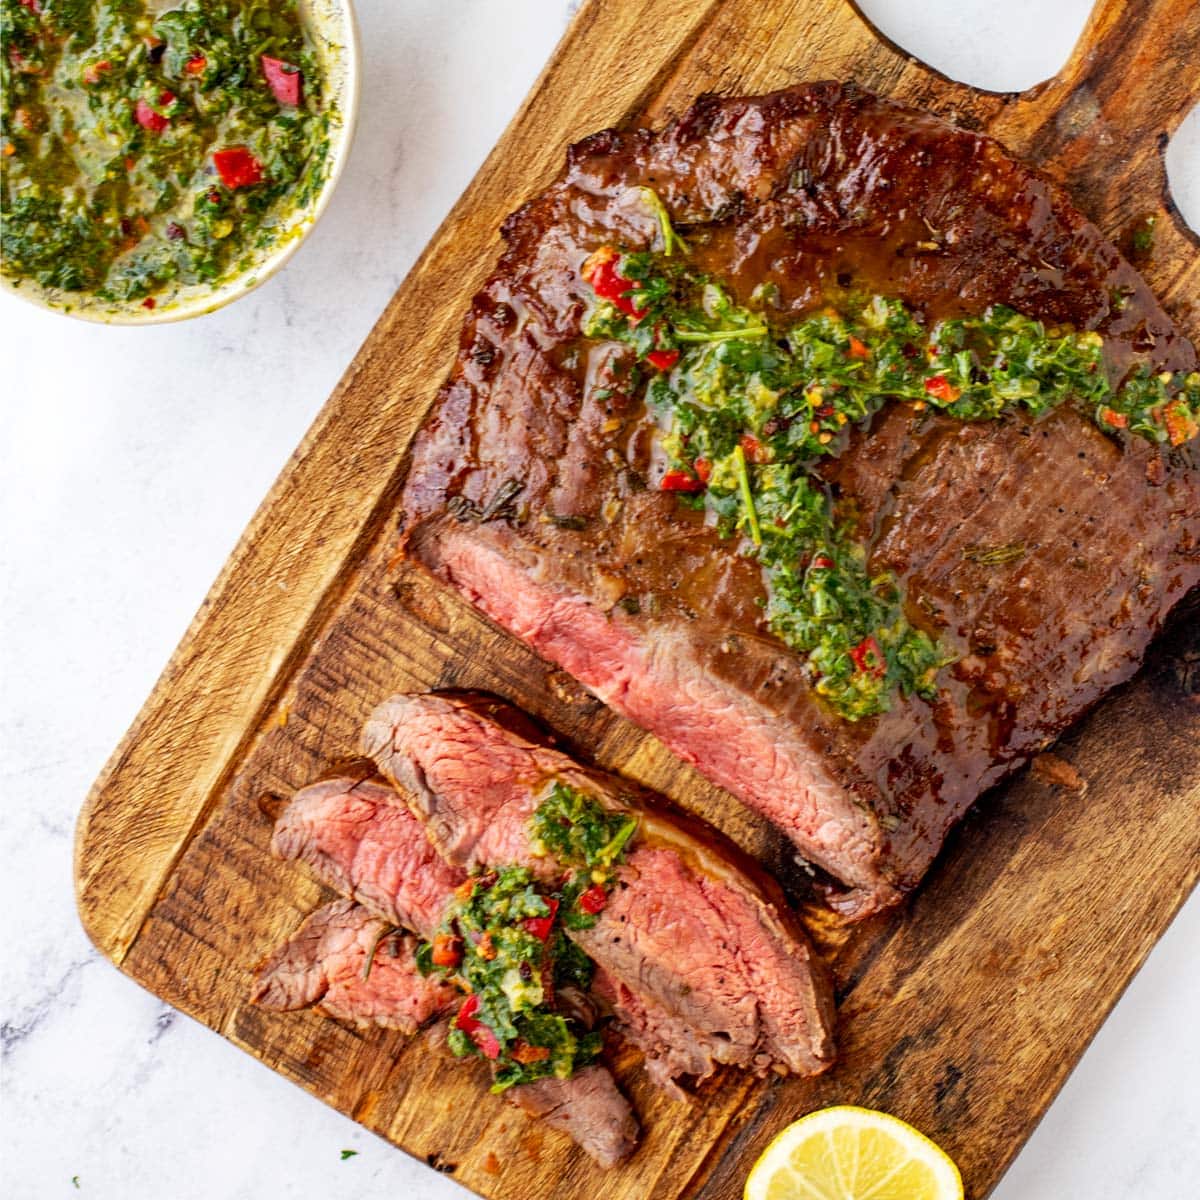
6. Skirt/Flank Steak with Cilantro-Garlic Sauce — The 1g Carb Benchmark
Time: 5 min prep / 15 min cook | Difficulty: Easy | Yield: 4 servings | Est. Macros: 43g protein / 1g carbs / 38g fat
This is the lowest-carb preparation in the entire guide: 1 gram of total carbohydrates per serving, confirmed by Serious Eats' own nutrition data. The cilantro-garlic sauce is a blender chimichurri that comes together in 90 seconds while the steak rests. The cumin-forward dry rub creates a crust that mimics a longer marinade without any waiting. The macros — 43g protein, 1g carbs, 38g fat — are essentially the platonic ideal of a keto protein meal.
Key Ingredients:
For the dry rub: - 1 tsp ground cumin - ½ tsp kosher salt - ½ tsp black pepper
For the cilantro-garlic sauce: - 1 medium garlic clove - ½ tsp salt - 1 cup coarsely chopped fresh cilantro (loosely packed) - ¼ cup extra-virgin olive oil - 2 tbsp fresh lemon juice - ⅛ tsp cayenne
The Method: 1. Combine cumin, salt, and pepper in a small bowl. Pat the flank steak completely dry with paper towels on all surfaces — the exterior should feel tacky, not slick. Press the spice mixture firmly into both sides. 2. Heat a cast iron skillet over high heat for 2–3 full minutes. Add a thin film of avocado oil — not olive oil, which will smoke and burn at this temperature. The oil should shimmer immediately on contact. 3. While the pan heats, make the sauce: mince the garlic clove and mash it to a paste with the flat side of a chef's knife and ½ tsp salt. Transfer to a blender or mini food processor with cilantro, olive oil, lemon juice, and cayenne. Blend until smooth. Taste, adjust salt, and set aside. 4. Sear the steak, flipping every 30 seconds, for approximately 8–10 minutes total for a ¾-inch thick cut to reach medium (140°F internal). Contrary to conventional mythology, frequent flipping produces a more even crust and a thinner overcooked gray band — both critical advantages with this lean cut. Press the thicker end down with an offset spatula during each flip to ensure contact. 5. Transfer to a wire rack set over a rimmed baking sheet. Rest 5–7 minutes minimum. This is not optional. 6. Identify the grain direction — it runs lengthwise on flank steak. Rotate the steak so the grain runs left-to-right, then slice top-to-bottom at a 45-degree angle, thin against the grain. Drizzle cilantro-garlic sauce over the slices and serve immediately.
The hack: This sauce keeps refrigerated for 3 days and functions as a marinade, a dipping sauce, and a salad dressing for leftover steak slices. Make a double batch on Sunday; use it all week.
Serious Eats
The Master Cheat Codes
These are the cross-protein shortcuts that actually work — extracted from the best technical sources across all six sub-reports and unified into a single reference. Every entry in the "How To" column is specific enough to execute tonight.
| Shortcut | How To | What It Replaces | Why It Works |
|---|---|---|---|
| Baking soda shrimp brine | Toss 1 lb shrimp with ¼ tsp kosher salt + ¼ tsp baking soda; rest uncovered in fridge 15–60 min before cooking | Extended marinating time | Raises surface pH, accelerating Maillard browning so exterior chars before interior overcooks |
| The 10-second skin press (salmon) | Press fillet skin-side down with a flexible spatula for exactly 10 seconds immediately after it enters the pan | Nothing — this step has no substitute | Prevents skin buckling and curling; forces full contact across the entire surface for even crust development |
| Double-duty marinade (chicken) | Make twice the vinaigrette; split into two containers before any raw chicken touches it; use one for marinating, one for finishing | A separate pan sauce | The reserved half retains all its fresh, bright aromatics — heat hasn't volatilized anything |
| Mayonnaise as a meat coating | Rub 1–2 tbsp mayo per pound of protein over the surface before cooking | Oil-based marinades | Emulsified egg and fat adheres to protein better than plain oil, prevents sticking, and creates a lacquered crust without burning |
| Pull 5°F early + rack rest | Remove from heat at 125°F (steak), 140°F (pork), 120°F (salmon), 155°F (chicken); rest on a wire rack, not a plate | Guessing doneness at the pan | Carryover cooking handles the final degrees; rack prevents steam from softening the crust you just built |
| Dry brine, uncovered, in the fridge | Salt generously, set on a wire rack uncovered, refrigerate 45 min to overnight | Wet brining or immediate cooking | Salt draws out moisture then reabsorbs it, seasoning the interior while simultaneously drying the exterior for better browning |
| Microplane garlic for marinades | Grate garlic directly into marinade on a fine microplane — no knife needed | Minced or pressed garlic | Creates a smooth paste that distributes evenly and clings to every surface rather than pooling at the bottom of the bowl |
| Pound chicken to ¾-inch uniform thickness | Place breast in a zip-lock bag, beat the thick end down with a meat mallet or heavy pan to match the thin end | Butterflying or buying cutlets | Eliminates the core problem: thin tail overcooking while the thick center catches up |
| Snug double-skewer for shrimp | Thread each shrimp onto two parallel skewers spaced ¼ inch apart; pack shrimp tightly so they nearly touch | Single skewers with spaced shrimp | Reduces exposed surface area, slowing heat penetration and buying 60–90 extra seconds of grill time for browning |
| Freshly ground fennel seed in rubs | Buy whole fennel seeds; pulse 10 seconds in a spice grinder immediately before using | Pre-ground fennel | Freshly ground has ~3x the aromatic intensity of pre-ground; the volatile oils that make fennel distinctive dissipate rapidly after grinding |
| Rao's marinara for keto pasta sauces | Use Rao's Homemade Marinara directly from the jar — no doctoring required | Generic store-bought marinara | 4g net carbs per ½ cup versus 12–15g in most commercial brands; the sugar difference is significant enough to affect ketosis |
| Post-cook garlic dressing (shrimp) | Toss shrimp in garlic-olive oil dressing immediately off the grill rather than pre-marinating | Pre-cook garlic marinades | Heat volatilizes garlic's most pungent aromatic compounds; applying after cooking delivers dramatically more garlic impact |
The Bottom Line
If you cook just four things from this guide, make them:
-
Kenji's Crispy Pan-Seared Salmon (for mastering the foundational technique) — Zero carbs, four ingredients, and a method so transferable that once you understand the 90/10 skin-side rule you'll never need another salmon recipe. 15 minutes.
-
Five-Minute Grilled Chicken Cutlets with Rosemary, Garlic & Lemon (for weeknight efficiency) — The double-duty dressing trick eliminates the need for advance planning while delivering chicken that tastes composed and intentional. One gram of carbs. Genuinely ten minutes if you buy pre-cut cutlets.
-
Cilantro-Garlic Flank Steak (for maximum protein, minimum carbs) — 43 grams of protein per serving, 1 gram of carbs, and a sauce that works as dressing and marinade all week. This is the recipe that teaches you why slicing against the grain matters more than the sear itself.
-
Rosemary Garlic Pork Tenderloin with Citrus Pan Sauce (for when the occasion requires it) — The sear-roast method is the most efficient path from raw protein to dinner-party-worthy plate that exists. Thirty minutes, zero compromise.
Here is what actually separates the home version from the restaurant version across all of these preparations: it isn't equipment, it isn't premium ingredients, and it isn't time. It's the willingness to let the protein tell you when it's ready instead of acting on a predetermined schedule. Restaurant cooks read the fish — they look at the cross-section, they test resistance with a spatula, they measure temperature. They don't open the oven at 18 minutes because the recipe said 18 minutes. Develop that sensory fluency — learn what a C-shaped shrimp looks like, learn when salmon skin releases cleanly, learn what 130°F feels like under your fingertip — and every recipe in this guide becomes something you're improvising from memory rather than executing by instruction.
That's the only gap left to close.